
[Hacking Ginantsilyo]
Project Description
It wasn’t an original design. In fact if you visit the stalls in mines view and wright park, you would see a lot of these in their shelves. What inspired me to make one too was it was when I obtained my first batch of baguio yarns and the lady who pointed me the place to buy them was making on these particular top. I bought one from one of the seller and tried to hack the stitches used for the blouse. 
Finished Product

Pyschedelic Shell

Pyschedelic shell worn by momoink
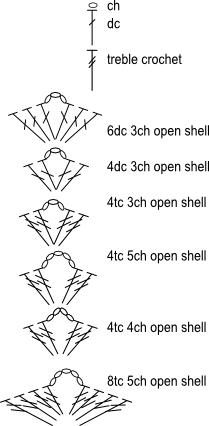
About the Stitches:
As i said, the stitches are pretty simple, I used ch, dc, tc, dc shell and tc shell.
Gauge:
5ch ~ 1 in
1dc ~ 1/2 in.
Materials:
- 3.0mm crochet hook
- 6strands(ply) Soft Cotton Yarn from Baguio (I think each strand is comparable in thickness to any sewing thread)
- 12 strands(ply) Soft Cotton Yarn from Baguio color black. Same thickness as the 6-ply yellow yarn
- 1ply White Popcorn Yarn from Baguio
Stitch Diagram
Stitch Diagram for Pyschedelic Shell
Instructions:
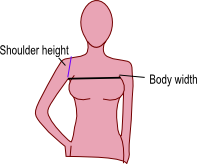
Take out your tape measure, measure the width of your upper body and your shoulder height.
The length of your foundation chain should be:
Length of foundation chain = Body width +4 x shoulder height.
Note that in this project, 5 ch is approximately 1in.
(Note that this blouse is made from shoulders down.)
Using yellow and black yarn, together:
Crochet chain with length calculated from above. Slip st to first row to make a circle.
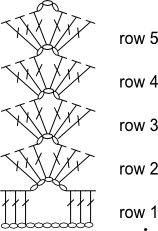 1st row: ch 3 (counts as 1 dc), *(ch 5, skip 5 ch sp dc on next 3 st)*
Repeat from * until there are only 7 ch remaining. ch 5, skip 5 ch sp. dc on next 2ch sp. Slip st on 3rd ch of the row.
2nd row – 4th row: slip st on 3rd chain of previous row. * Create a 6dc 3ch open shell on the 5 ch sp.
Skip the next 3 stitches. * Repeat *
On the fifth row, you are going to make spaces for your arms. These will serve as the sleeves of your blouse.
How does this work?
My shoulder height is around 7.5in. So the space i ought to allot for a sleeve is around 15in.
That would probably take 75 ch. and one open shell needs about 9 ch. So in a sleeve there should be 8 shells.
Just divide your crocheted article now into half. Count the number of shells you have. In my project i have 35 shells. I skipped 8 shells for a sleeve in both sides, leaving me with 10 shells for the front part and 9 for the back part.
 For the 5th row, I crochet 6 dc 3ch open shells 10 times. skipped 8 shells, then crocheted 6dc 3ch open shells on the next ‘9 shells’ from previous row. Skip 8 shells and slip stitch on 3rd ch.
At this point you should have 2 open arm holes.
row 6: crochet 6dc 3ch open shell around.
Fasten off yarn, attach the popcorn yarn.
Using the popcorn yarn:
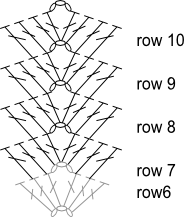
The following is the stitch diagram for rows 7-10.
(Fasten off yarn and change color)
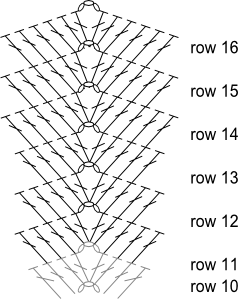
Using two of the yellow yarn (to compensate for the weight):
The following is the stitch diagram for rows 11-16
 Fasten off yarn, attach the popcorn yarn
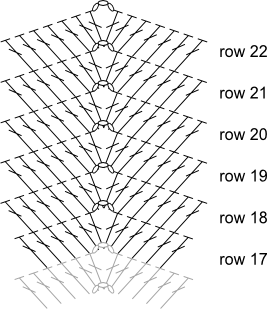
Using the popcorn yarn:
The following is the stitch diagrams for rows 17 – 22
Fasten off yarn, attach the (yellow + black yarn)
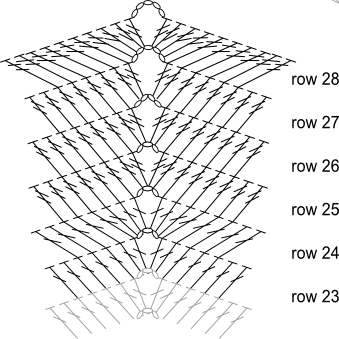
Using the yellow and black yarn together:
The following is the stitch diagrams for rows 23 – 28
I want to try & make your Psychedelic Shell but the picture would not come thru can you try & email the picture to me please.
I have tried to copy & paste the instructions for this top, but it won’t paste right. The diagrams for the stitches can’t be seen. It’s all black.
Could you possibly send it to me via email? It would be much appreciated.