Hacking Ginantsilyo

When I just want to have that crocheted article I’ve found on the net or random stores :)

Crocheted Bag Hack From Miu-Miu

I want to crochet a bag and I have been eyeing this bag (randomly found on google):

Miu Miu Crochet Bag

Miu Miu Crochet Bag – image courtesy of http://eudelpng.org/miu-miu-crochet-bag.html

Then last night, I found out that today is a holiday. It means I am not required to work (Though I work even though I am not required) This led me into crocheting to my heart’s content.
Come morning, I promised Id render some work on the afternoon (tentatively, after lunch). It was my husband who bath my kiddo because I was still hooking up:

Front Design

Front Design

I am excited on how this will turn up so after lunch i still crocheted some more:

Back and FrontBack and Front

I am slave to my crochet hook. I cannot stop.

Back and Front

Close up Detail

I have some leather yarn (or cord) that I have been keeping for the longest time now, and finally I have some good use for it.

Almost done!

Almost done!

Look! It’s almost done now. the only reason why i stopped is because my hands are literally shaking. I just have to stop.z But I want to finish this. I will attach a plastic canvas into a cloth as lining to make a sturdy frame. I am planning to include this bag into a lot of stuffs I am planning to sell. I hope it will click. :)

AngieHeart’s Shorts: Lace Edgings and Stitching Together

The final part of the series:

[Introduction, Basic Square, Connecting the Squares, Mesh & Half Motifs]

Now we are ready to crochet the last part of the shorts – The Lace Edging. The design uses a beautiful lace motif: a fan shaped lace with in between mesh.

You have to count your previous stitches here.The counting is as follows:
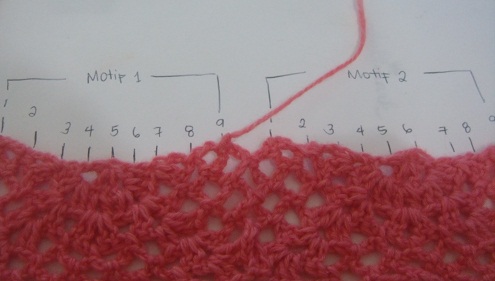
Foundation for the lace edging

Foundation for the lace edging

Each numbered stitch is where your dc 2ch will be stitched
Note that in my project, I have 7 half motifs stitched around.

Round 1: dc 2ch (or 3ch depending on the tightness of your stitches)make sure that the mesh around would not be too loose nor too tight.

Round 2: 3sc on each ch space, around (or 2sc depending on the tightness you want if round 1 is too loose, make it tighter by decreasing the number of sc in this row)

Round 3: 6ch (counts as 1 sc and 4 ch). (Note: sc on space between 3sc’s of previous row). Do sc 4ch around.

Round 4: Start on the middle of 4ch sp of previous row (slip st to the middle).  Do 2 ( sc 4ch ) You will reach the center of your half motif. * 5 dc into the next sp, sl st on next ch sp, counts as 1 sc.   Do 6 more sc-4ch repeats.* Repeat (*) around until you reach the two sc 4ch repeats you made on the start.

Round 5: Start on the middle of 4ch sp of previous row (slip st to the middle).   ( sc 4ch ) . * Do a dc – 2dc alternately on each five stitches of previous row.  sl st on next ch sp(count as one sc) 4ch .  Do 5 more  sc-4ch repeats. * Repeat (*) around until you reach the first sc-4ch you made on the start.

Round 6: sl st to the middle. **ch, *2dc on dc of previous row, ch skip one st* Repeat (*) four more times, sl st on next sp. (counts as 1 sc) 4 ch. Do 4 more sc-4ch repeats.*. Repeat (**) around until you reach the first st of your round. sl st on first ch.

Round 7: 3ch (counts as 1 dc) dc on each st (should have 14 dc) sl st on next sp. do the4  mesh until u reach the center again. dc on each st. repeat round

Round 8: ** 3ch (counts as 1dc) dc on same st. *2ch skip 2st. 2dc on next st* Repeat (*) 5 more times. 2ch sl st on next ch sp. Do 3 mesh. ** Repeat(**, note include additional 2ch at the start of **) around. then 2ch to close the round

Round 9. 3ch (counts as 1 dc) dc on next st . 2dc on ch space. repeat until you fill the center. (you should have 24 dc). sl st on next sp. *Do 2 mesh. 26 dc sl st on next ch sp* Repeat (*)around until you reach the last mesh of previous row. 2dc to close the round.

Round 10. sl st until you reach 3rd dc of previous round. 3ch (counts as 1dc) dc on next st. *2ch skip two stitches, dc on next two st.* Repeat (*) five more times. 2ch sc on next ch sp. ** Do 1 mesh.  ***2ch skip 2 st., dc on next two st***  Repeat (***) 6 more times, 2ch. ** Repeat (**) around. until you reach last mesh of previous row. ch 2 dc on next two st. ch 2. close the round.

Round 11. sl s until you reach the first ch of previous row. 3ch (counts as 1 dc) dc on ch space.* 2ch skip 2st, 2dc on next ch space.* Repeat (*) 5 more times sl st. ***(  **2ch sk 2st, 2dc on ch sp** Repeat ** 6 more   timess. sl st on next ch sp) *** Repeat *** around. :) then close the round and complete first motif by doing 2dc on ch sp, 2ch skip 2 st, 2dc on ch sp, 2ch.

Round 12 😀 FINALLY! LAST ROW! sl st on ch sp. Picot ( sc on ch sp 4ch sl st on sc, sc on ch space). sc on next two st, picot around 😀

YEI!!! DONE WITH THE LACE EDGING!

Lace edging

Lace edging

All you have to do next is to stitch the parts :) Be careful with stitching and do not ruin the lace design of the motif. To do this properly i pin the two parts in another pair of cropped pants I own:

See that there is still missing space for the shorts at the back.
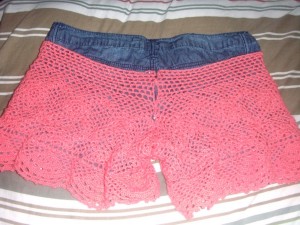
Back of shorts

Back of shorts

I have to fill this space by doing another mesh:

The lace mesh has 26 rows that is composed of dc 2ch (9 mesh in first row) up to 2 mesh on 26th row. The decreases depends on you :) I actually did not bother to count if the two lace mesh i made was exactly the same count :) Counting is sometimes stressful :)

Remember to make two of this!

Remember to make two of this!

Now, let’s sew the parts! :

Sew the back mesh we just made into each pair of back part of the short. The back part is the one with extra triangular half motif we made.

Then sew the back parts together!
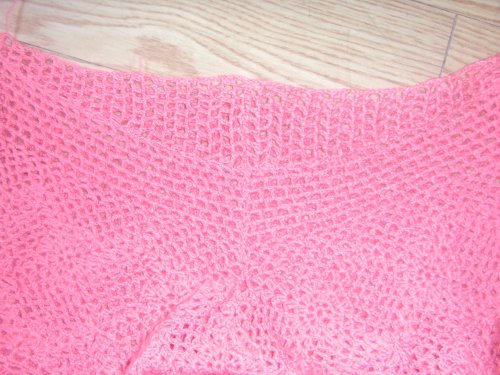
Back Part!

Back Part!

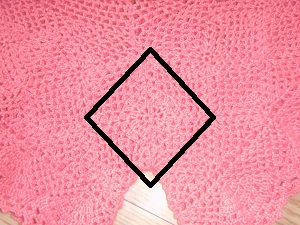
The half triangular motifs on each part will form a diamond shape when sewn :)

When you get this, it is your assurance that you are sewing the parts properly.

When you get this, it is your assurance that you are sewing the parts properly.

And sew around until you are done sewing the front :)

Front part

Front part

:)

You can choose to put a lining to your shorts and a space for garter :) I lined mine and sew drawstring for the waist. :)

Luckily for me I have an old top that i am no longer using so I am going to upcycle this by incorporating it to my crocheted shorts :)


Old clothes i want to use for my shorts

Old clothes i want to use for my shorts

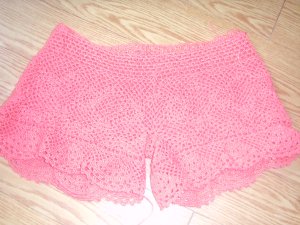
Next! The finished shorts! 😀

If anyone succeeds on creating the whole thing from my hack please send me a link! :) I want to know if i have been helpful :)

AngieHeart’s Shorts: Lace Mesh and Half Motifs

I am following up on the instructions on making the AngieHeart’s Crocheted Lace Shorts. My last post was about crocheting motifs together.

The first layer of the motif is actually too short for me. So I added a layer of half-motifs.

The following is the instructions on making the half-motifs:

1. 4ch to form a ring. 4ch,  *dc ch * (repeat * twice),  Turn around

2. (Row 2) 3ch dc on first st, create open shell 1 on next ch space [Open Shell 1: 2dc ch 2dc], 2dc on next ch space, openshell1 on next ch space, 2dc on last st. Turn around

3. (Row 3) Do a half open shell 1 on first st, with 3ch as your first dc [Half Open Shell 1: 1dc ch 2dc], Open Shell 2 on next ch space [Open Shell 2: 2dc 2ch 2dc], Open shell 1 in between the 2dc of previous row, Open shell 2 on next ch space, Half open shell 1 on last st. Turn around

4. (Row 4) ch, sc on first st. 4ch sc, 3ch Open shell 2 on the corner, 3ch sc, 4ch sc, 4ch sc,  3ch, Open Shell 2 on the corner, 3ch sc, 4ch sc. Turn around

5. (Row 5) 5 ch sc, 4ch sc, 3 ch, Open shell 2 on the corner, 3ch sc, 4ch sc, 4ch sc, 4ch sc,  3ch, Open Shell 2 on the corner, 3ch sc, 4ch sc, 2ch dc on last st. Turn around.

Row 5: Angie Heart’s Crocheted Lace Shorts Half Motif (Before Stitching with the other motifs)

Row 5: Angie Heart’s Crocheted Lace Shorts Half Motif (Before Stitching with the other motifs)

On Row 6 you have to begin stitching the half motif as you go. Always sc alternately into your half motif and onto the other motifs.

6. (Row 6) ch, sc on same st. 4ch sc, 4ch sc, 3ch, OpenShell2 on the corner, 3ch sc, 4ch sc (three times) 3ch Open shell2 on the corner, 3ch sc, 4ch sc, 4ch sc. Yarn off

Row 6: Angie Heart’s Crocheted Lace Shorts Half Motif (After Stitching with the other motifs)

Row 6: Angie Heart’s Crocheted Lace Shorts Half Motif (After Stitching with the other motifs)

Then the next would be crocheting the upper part to form the waist of the shorts.

The mesh is composed of two parts:

  1. 4ch sc repeats on four rows
  2. 1dc 2ch (or 3ch, if you want a bigger waistline) repeats on remaining rows (the number is indefinite, depending on how long you want the upper part to be, I did 7 rows of this mesh)
AngieHeart's Crocheted Lace Shorts: Other Half Showing Two Layers of Lace Mesh

AngieHeart’s Crocheted Lace Shorts: Other Half Showing Two Layers of Lace Mesh

The length of your mesh depends on you. I decided on a shorter mesh, but on my first shorts, the mesh is wider.

First Crocheted Shorts showing a wider lace mesh

First Crocheted Shorts showing a wider lace mesh

——————————–

Two parts for the legs

Two parts for the legs

After finishing the parts of the shorts I am ready to crochet the lacy part around the legs (cuffs) but there is a problem with the design which I have noticed on the shorts I were able to make in the past. I added a modification to the design. The actual crocheted shorts doesn’t have a lining underneath to support the gap between the legs (That is pundyo in tagalog).

Space between the legs

Space between the legs

So, I added another half square motif to fill the gap.

Filling the gap

Filling the gap

Then there is another gap for the buttocks, since the behind is always fuller than the front, there would be a gap if uniform stitches were made for the front and the back.

Gap on the back

Gap on the back

My solution to this is to crochet another half motif (a triangular one) to fill the gap.

Filling the Gap II

Filling the Gap II

You have to follow the instructions for the basic square motif but just make sure you only have to crochet three corners instead of four. Then remember to stitch into the other motifs when you are already working on the 6th row.

Next is making the lace:

AngieHeart's Shorts: Lace Edging

AngieHeart’s Shorts: Lace Edging

See you on my next post!

Angie Heart’s Shorts – crocheting motif squares together

Following up my previous post about crocheting the Angie Heart’s crochet lace shorts, here are the instructions on how you would crochet the square motifs together:

1. You have to follow the instructions up to 5th round.

AngieHeart's Crochet Shorts Basic Square Motif Up to Round 5

AngieHeart’s Crochet Shorts Basic Square Motif Up to Round 5

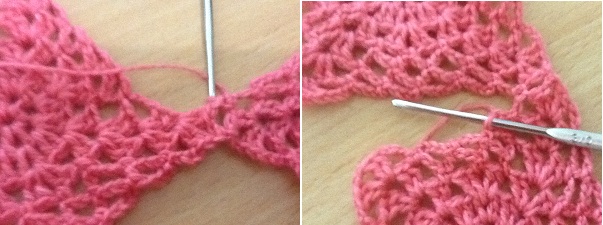
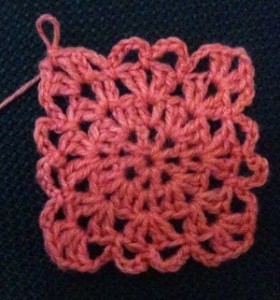
2. For the 6th round, crochet the first half of the open shell [ 3ch, dc 1ch, then sc into one of open shell’s of another square, sc into the ch space]

AngieHeart's Crochet Shorts Basic Square Motif - crocheting into another square 1

AngieHeart’s Crochet Shorts Basic Square Motif – crocheting into another square 1

Then continue doing the rest o f the open shell into the square.

AngieHeart's Crochet Shorts Basic Square Motif - crocheting into another square 2

AngieHeart’s Crochet Shorts Basic Square Motif – crocheting into another square 2

3. crochet 1 ch and sc into the next ch space of the other square then ch 1 and sc into the next ch space of your square

AngieHeart's Crochet Shorts Basic Square Motif - crocheting into another square 3

AngieHeart’s Crochet Shorts Basic Square Motif – crocheting into another square 3

4. Do the same thing on the next ch spaces. Do 2ch sc into the other square, 2ch and sc into the square for all ch sp with 4 ch. and 1 ch sc 1 ch to the ch sp with only 3ch.

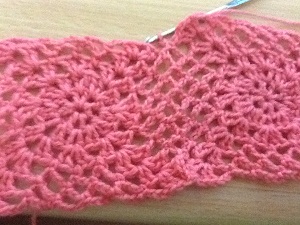
Your two squares should be connected as if they were crocheted as one 😀

AngieHeart's Crochet Shorts Basic Square Motif - crocheting into another square 4

AngieHeart’s Crochet Shorts Basic Square Motif – crocheting into another square 4

5. Finish connecting two squares by connecting the corner open shells again: 2dc ch, sc on the other square, ch 2dc into square

Finish the rest of the 6th round:

AngieHeart's Crochet Shorts Basic Square Motif - crocheting into another square 5

AngieHeart’s Crochet Shorts Basic Square Motif – crocheting into another square 5


Connect 6 squares together. And make two connected rectangles :) so that’s 12 square motifs you have to make!

Next is crocheting the mesh :) on top of the motifs :D

AngieHeart’s Crocheted Lace Shorts – Basic Square Motif

Please read the introduction here.

[Hacking Ginantsilyo]

Looking closely, you can see that the basic design of the shorts is made up of a square motif. This is me, trying to hack the motif design:

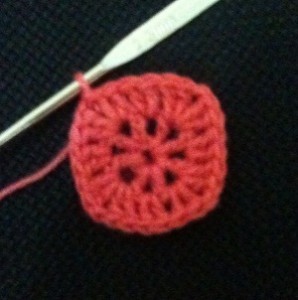
Foundation Ring: ch 4

Foundation Ring - AngieHeart's crocheted lace shorts

Foundation Ring – AngieHeart’s crocheted lace shorts

Round 1: 4ch * dc ch * repeat (*) around (should have 8 spaces)

Round 1 - AngieHeart's crocheted lace shorts

Round 1 – AngieHeart’s crocheted lace shorts

Round 2: (begin at the ch space)

OpenShell1 [2dc 2ch 2dc]

Begin at the ch space, 3ch dc 2ch 2dc on same st. *2dc on next ch space, do OpenShell1 on next ch space* Repeat 3x. 2dc on next ch sp. sl st to close the round


Round 2 - AngieHeart's crocheted lace shorts

Round 2 – AngieHeart’s crocheted lace shorts

Round 3: (begin at ch space)

OpenShell2 (2dc 1ch 2dc)

begin at ch space of the shell stitch. 3ch dc 2ch 2dc on same st. * Do OpenShell2 in between the 2dc of previous row. Do OpenShell1 on next ch space * Repeat (*) 3x. Do OpenShell2 in between the 2dc of previous row.sl st to close the round

Round 3 - AngieHeart's crocheted lace shorts

Round 3 – AngieHeart’s crocheted lace shorts

Round 4: (Begin at the ch space of the shell stitch)

3dc dc 2ch 2dc on ch space. *3ch sc in between two shell stitches of previous row. **4ch sc on next ch space** Repeat(**). 3ch, do openshell1 on next ch space* Repeat (*) 3x. *3ch sl st in between two shell stitches of previous row. **4ch sl st on next ch space** Repeat(**). 3ch. sl st to close the round

Round 4: Angie Heart's Crocheted lace shorts

Round 4: Angie Heart’s Crocheted lace shorts

Round 5: (begin at the ch space of the shell stitch)

3dc dc 2ch 2dc on ch space. *3ch sc  on next ch sp **4ch sc on next ch space** Repeat(**) 2x. 3ch, do openshell1 on next ch space* Repeat (*) 3x. *3ch sl st in between two shell stitches of previous row. **4ch sl st on next ch space** Repeat(**) 2x. 3ch. sl st to close the round

Round 5: Angie Heart's Crocheted Lace Shorts

Round 5: Angie Heart’s Crocheted Lace Shorts

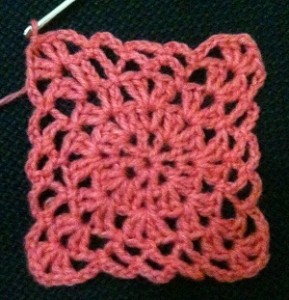
Round 6: (begin at the ch space of the shell stitch)

3dc dc 2ch 2dc on ch space. *3ch sc  on next ch sp  **4ch sc on next ch space** Repeat(**) 3x. 3ch, do openshell1 on next ch space* Repeat (*) 3x. *3ch sl st in between two shell stitches of previous row. **4ch sl st on next ch space** Repeat(**) 3x. 3ch. sl st to close the round

Round 6: Angie Heart's crocheted lace shorts

Round 6: Angie Heart’s crocheted lace shorts


You now have the basic square motif of the shorts! Congratulations!

Crocheting each square as you go is the next. See you again!

Crocheted Shorts

[Hacking Ginantsilyo]

Search Term(s): Crocheted Shorts

Link: http://www.google.com.ph/search?q=crocheted+shorts&hl=en&client=safari&tbo=d&source=lnms&tbm=isch&sa=X&ei=-kJoUNiTBKrBiQe024DgDw&ved=0CAkQ_AUoAQ&biw=1024&bih=672

 Chosen Entry: Lacy Shorts By [Angie Heart’s] Tokyo Fashion Co. blogged by All Things Beautiful

Crochet Lace Shorts by Angie Hearts

Crochet Lace Shorts by Angie Hearts

Reason for searching: I bought a tankini for my baby’s first birthday party (It’s a swimming party) But I just can’t go wearing just the tankini for two reasons: first, it’s a kid’s party and second my mom might just be too scandalized if I wear the tankini (just the tankini) all day throughout the party.

And so, since I am an avid crocheter indeed, I just had to crochet a pair of shorts for the party. I have found the right shorts, now I just have to figure out the stitches! hehe 😀

Here is the result:

Crocheted Shorts Challenge!

Crocheted Shorts Challenge!


And of course, an actual pic during the birthday party:

My Baby's swimming Party with me wearing the crocheted shorts

My Baby’s swimming Party with me wearing the crocheted shorts

Stay tuned for the pattern and instructions!

[Updated: Let’s get started with the basic square!]

Free Pattern: Psychedelic Shell

[Hacking Ginantsilyo]

Project Description

It wasn’t an original design. In fact if you visit the stalls in mines view and wright park, you would see a lot of these in their shelves. What inspired me to make one too was it was when I obtained my first batch of baguio yarns and the lady who pointed me the place to buy them was making on these particular top. I bought one from one of the seller and tried to hack the stitches used for the blouse. :)


Finished Product

Pyschedelic Shell

Pyschedelic Shell

Pyschedelic shell worn by momoink

Pyschedelic shell worn by momoink

Continue reading