😀 I’m in a good mood to give away the patterns i wrote before  Guys, dig in!

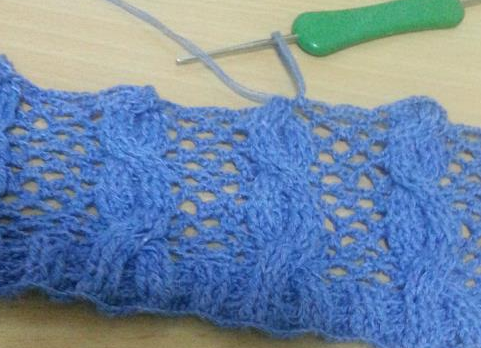
Ribbed Hexagonal Beret

Ribbed Hexagonal Beret
Size: Fits average women’s head
Materials: Mint Green Acrylic Yarn [Fingering Weight] (4 Strands), 3.0mm Hook
Instructions:
Chain 4, slip st to form a ring.
Round 1: chain 1 (does not count as a stitch). Work 12 sc into ring. Join with a sl st in first ch.
Round 2: ch 3(counts as 1 dc) FPDc on same stitch. 2Dc on next st *dc on next st, FPDc on same st., 2 dc on
next st.* Repeat * 5 times. Join with a sl st in 3rd chain..
Round 3: chain 1 (does not count as stitch). Skip st, FPSc on next st, ch 2. FPDc on skipped st. 2dc on next 2
st, 2dc on next st, 2dc on next 2 st,*skip st, FPDc on next st, FPDc on skipped st,2dc on next 2 st, 2dc next st,
2dc on next 2 st*. Repeat * 5 times.Slip stitch on second chain of row.
Round 4: chain 1 (does not count as stitch). Skip st, FPSc on next st, ch 2. FPDc on skipped st. 3dc on next 3
st, 2dc on next st, 3dc on next 3 st,*skip st, FPDc on next st, FPDc on skipped st, 3dc on next 3 st, 2dc on next
st, 3dc on next 3 st*. Repeat * 5 times.Slip stitch on second chain of row.
Round 5: chain 1 (does not count as stitch). Skip st, FPSc on next st, ch 2. FPDc on skipped st. 4dc on next 4
st, 2dc on next st, 4dc on next 4 st,*skip st, FPDc on next st, FPDc on skipped st, 4dc on next 4 st, 2dc on next
st, 4dc on next 4 st*. Repeat * 5 times.Slip stitch on second chain of row.
Round6: chain 1 (does not count as stitch). Skip st, FPSc on next st, ch 2. FPDc on skipped st. 5dc on next 5 st,
2dc on next st, 5dc on next 5 st,*skip st, FPDc on next st, FPDc on skipped st, 5dc on next 5 st, 2dc on next st,
5dc on next 5 st*. Repeat * 5 times.Slip stitch on second chain of row.
Round 7: chain 1 (does not count as stitch). Skip st, FPSc on next st, ch 2. FPDc on skipped st. 6dc on next 6
st, 2dc on next st, 6dc on next 6 st,*skip st, FPDc on next st, FPDc on skipped st, 6dc on next 6 st, 2dc on next
st, 6dc on next 6 st*. Repeat * 5 times. Slip stitch on second chain of row
Round 8: chain 1 (does not count as stitch). Skip st, FPSc on next st, ch 2. FPDc on skipped st. 7dc on next 7
st, 2dc on next st, 7dc on next 7 st,*skip st, FPDc on next st, FPDc on skipped st, 7dc on next 7 st, 2dc on
next st, 7dc on next 7st*. Repeat * 5 times. Slip stitch on second chain of row
Round 9: chain 1 (does not count as stitch). Skip st, FPSc on next st, ch 2. FPDc on skipped st. 8dc on next 8
st, 2dc on next st, 8dc on next 8 st,*skip st, FPDc on next st, FPDc on skipped st, 8dc on next 8 st, 2dc on next
st, 8dc on next 8st*. Repeat * 5 times. Slip stitch on second chain of row
Round 10: chain 1 (does not count as stitch). Skip st, FPSc on next st, ch 2. FPDc on skipped st. 9dc on next 9
st, 3dc on next st, 9dc on next 9 st,*skip st, FPDc on next st, FPDc on skipped st, 9dc on next 9 st, 3dc l on
next st, 9dc on next 9st*. Repeat * 5 times. Slip stitch on second chain of row
Round 11: chain 1 (does not count as stitch). Skip st, FPSc on next st, ch 2. FPDc on skipped st. 10dc on next
10st, (2dc on next st) 2 times, 10dc on next 10 st,*skip st, FPDc on next st, FPDc on skipped st, 10dc on next
10 st, (2dc on next st) 2 times, 10dc on next 10 st,*. Repeat * 5 times. Slip stitch on second chain of row
Round 12: chain 1 (does not count as stitch). Skip st, FPSc on next st, ch 2. FPDc on skipped st. 11dc on next
11 st, (2dc on next st), dc on next st, (2dc on next st) 11 dc on next 11 st,*skip st, FPDc on next st, FPDc on
skipped st, 11dc on next 11 st, (2dc on next st), dc on next st, (2dc on next st), 11dc on next 11 st*. Repeat * 5
times. Slip stitch on second chain of row
Round 13: chain 1 (does not count as stitch). Skip st, FPSc on next st, ch 2. FPDc on skipped st. 30 dc on next
30 st, *skip st, FPDc on next st, FPDc on skipped st, 30dc on next 30 st, *. Repeat * 5 times. Slip stitch on
Round 14: chain 1 (does not count as stitch). Skip st, FPSc on next st, ch 2. FPDc on skipped st. 31 dc on next
31 st, *skip st, FPDc on next st, FPDc on skipped st, 31dc on next 31 st, *. Repeat * 5 times. Slip stitch on
second chain of row second chain of row
Round 15: chain 1 (does not count as stitch). Skip st, FPSc on next st, ch 2. FPDc on skipped st.15 dc on next
15 st, 2dc cluster on next 2st, 15dc on next 15 st *skip st, FPDc on next st, FPDc on skipped st, 315 dc on next
15 st, 2dc cluster on next 2st, 15dc on next 15 st *. Repeat * 5 times. Slip stitch on second chain of row
Round 16: chain 1 (does not count as stitch). Skip st, FPSc on next st, ch 2. FPDc on skipped st. 2dc cluster on
next 2st, 12 dc on next 12 st, (2dc cluster on next 2st) 2 times, 12 dc on next 12 st, 2dc cluster on next 2st,
*skip st, FPDc on next st, FPDc on skipped st, 2dc cluster on next 2st, 12 dc on next 12 st, (2dc cluster on next
2st) 2 times, 12 dc on next 12 st, 2dc cluster on next 2st, *. Repeat * 5 times. Slip stitch on second chain of row
Round 17: chain 1 (does not count as stitch). Skip st, FPSc on next st, ch 2. FPDc on skipped st. (2dc cluster on
next 2st)2 times, 9 dc on next 9 st, (2dc cluster on next 2st) , dc on next st, (2dc cluster on next 2st), 9dc on
next 9 st, (2dc cluster on next 2st)2 times, *skip st, FPDc on next st, FPDc on skipped st, (2dc cluster on next
2st)2 times, 9 dc on next 9 st, (2dc cluster on next 2st) , dc on next st, (2dc cluster on next 2st), 9dc on next 9
st, (2dc cluster on next 2st)2 times, *. Repeat * 5 times. Slip stitch on second chain of row
Round 18: chain 1 (does not count as stitch). Skip st, FPSc on next st, ch 2. FPDc on skipped st. skip st, (2dc
cluster on next 2st) , 7 dc on next 7 st, (2dc cluster on next 2st) 3 times 7 dc on next 7 st, (2dc cluster on next
2st), skip next st., *skip next st, FPDc on next st, FPDc on skipped st, skip st, (2dc cluster on next 2st) , 7 dc on
next 7 st, (2dc cluster on next 2st) 3 times 7 dc on next 7 st, (2dc cluster on next 2st), skip next st.,*. Repeat * 5
times. Slip stitch on second chain of row
Round 19: chain 1 (does not count as stitch). Skip st, FPSc on next st, ch 2. FPDc on skipped st. (2dc cluster
on next 2st) 2 times, 14 dc on next14 st, (2dc cluster on next 2st)2 times *skip next st, FPDc on next st, FPDc
on skipped st, skip st, (2dc cluster on next 2st) 2 times, 14 dc on next14 st, (2dc cluster on next 2st)2 times ,*.
Repeat * 5 times. Slip stitch on second chain of row
Round 20: chain 1 (does not count as stitch). Skip st, FPSc on next st, ch 2. FPDc on skipped st. 18FPDc on
next 18 st *skip next st, FPDc on next st, FPDc on skipped st, skip st, 18FPDc on next 18 st ,*. Repeat * 5 times.
Slip stitch on second chain of row
Round 21: chain 1 (does not count as stitch). Skip st, FPSc on next st, ch 2. FPDc on skipped st. 18BPDc on
next 18 st *skip next st, FPDc on next st, FPDc on skipped st, skip st, 18BPDc on next 18 st ,*. Repeat * 5 times.
Slip stitch on second chain of row
Round 22: chain 1 (does not count as stitch). Skip st, FPSc on next st, ch 2. FPDc on skipped st. 18FPDc on
next 18 st *skip next st, FPDc on next st, FPDc on skipped st, skip st, 18FPDc on next 18 st ,*. Repeat * 5 times.
Slip stitch on second chain of row
Round 23: ch 1(does not count as stitch) Half Double crochet on each st. Slip st on first ch.
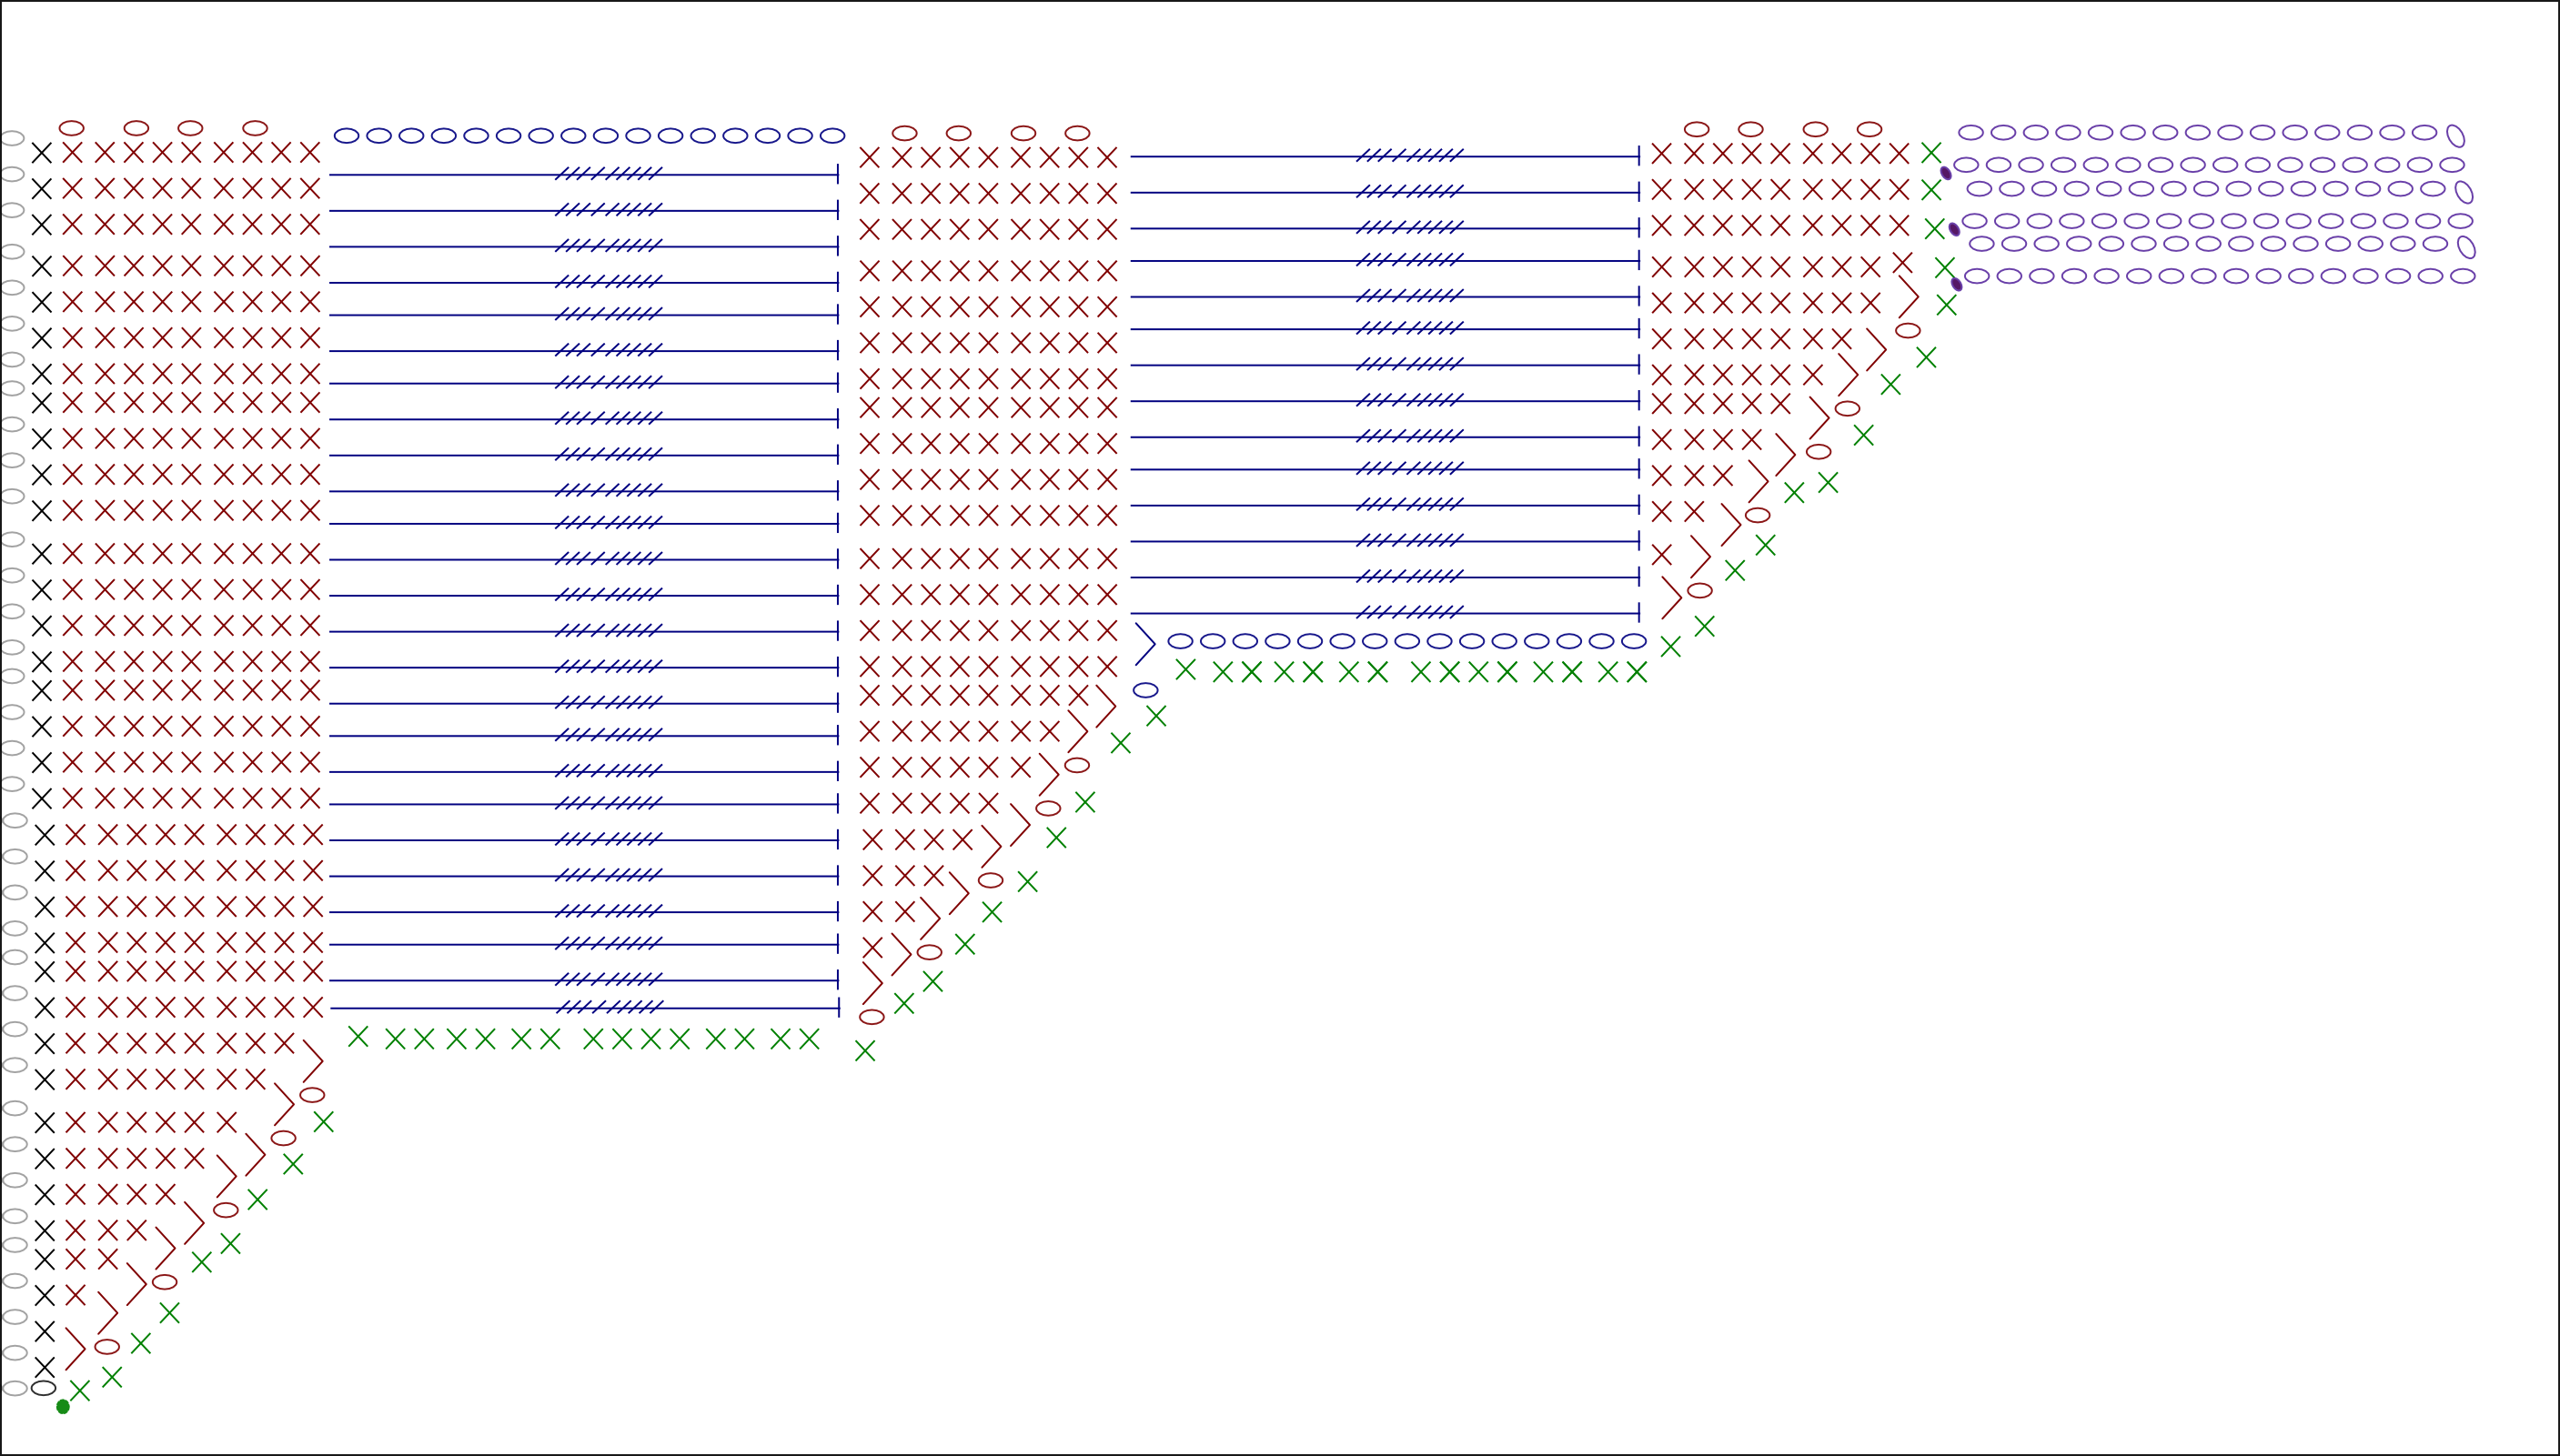
Pattern Diagram: